RPi-Monitor-LCD
This chapter is explaining how to use RPi-Monitor-LCD available in this github repository
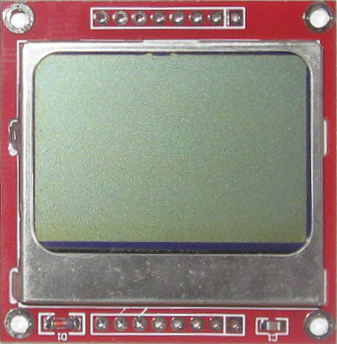
PCD8544 is a small and cheap LCD screen. We will see in this chapter how to use it and connect it to RPi-Monitor.
LCD connection
PCD8544 comes in two parts (the lcd screen and the pins) that need to be soldered together. Once done, it can be installed in the breadboard as shown in the drawing bellow:
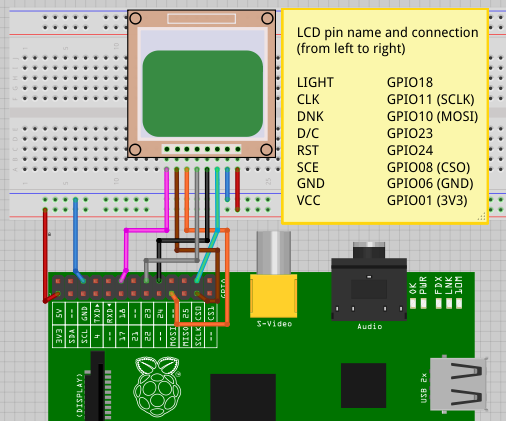
Schema made with Fritzing (fritzing.org)
Note
If you want to reproduce this assembly, check carefully the pin order, it may be different.
Preparation
My first goal is to test this new display. I look on the internet and find different solution using Python or C. After few tries, I decided to use Python based on the information shared into this post.
To use the PCD8544 display we need to install few software and load a kernel module.
First, let’s install wiringpi2 from drogon.net
git clone git://git.drogon.net/wiringPi
cd wiringPi
./build
Once wiringpi is installed, it is possible to test it with the following command:
gpio readall
| wPi | Name | Mode | Val | Physical | Val | Mode | Name | wPi | ||
|---|---|---|---|---|---|---|---|---|---|---|
| 3.3v | 1 | 2 | 5v | |||||||
| 8 | SDA | IN | Lo | 3 | 4 | 5V | ||||
| 9 | SCL | IN | Lo | 5 | 6 | 0v | ||||
| 7 | GPIO7 | IN | Lo | 7 | 8 | Lo | ALT0 | TxD | 15 | |
| 0v | 9 | 10 | Lo | ALT0 | RxD | 16 | ||||
| 0 | GPIO0 | IN | Hi | 11 | 12 | Hi | OUT | GPIO1 | 1 | |
| 2 | GPIO2 | IN | Lo | 13 | 14 | 0v | ||||
| 3 | GPIO3 | IN | Hi | 15 | 16 | Lo | OUT | GPIO4 | 4 | |
| 3.3v | 17 | 18 | Lo | OUT | GPIO5 | 5 | ||||
| 12 | MOSI | ALT0 | Hi | 19 | 20 | 0v | ||||
| 13 | MISO | ALT0 | Hi | 21 | 22 | Hi | IN | GPIO6 | 6 | |
| 14 | SCLK | ALT0 | Hi | 23 | 24 | Lo | ALT0 | CE1 | 10 | |
| 0v | 25 | 26 | Lo | ALT0 | CE1 | 11 | ||||
Now, install the python binding of wiringpi:
sudo apt-get install python-dev python-imaging python-imaging-tk python-pip
sudo pip install wiringpi2
The program we will use require spidev to be activated. The kernel module
should then be activated.
To do so, comment the line blacklist spi-bcm2708 by adding a heading #
in the file /etc/modprobe.d/raspi-blacklist.conf then reboot the
Raspberry Pi to activate this module.
Finally install spidev python library:
sudo pip install spidev
The prerequisite are now installed. In next chapter we will see how to install the python library in charge of driving the PCD8544 LCD and how to use it.
Installation
Into Raspberry Pi forum, an interesting post catch my attention. I used it as the base to control the LCD.
The library written Richard Hull’s is also interesting I then took this as a example to create module that can be directly installed on the Raspberry Pi.
This pcd8544 library resulting is available into its own dedicated repository in github.
To install it, execute the following commands:
git clone https://github.com/XavierBerger/pcd8544.git
cd pcd8544
./setup.py clean build
sudo ./setup.py install
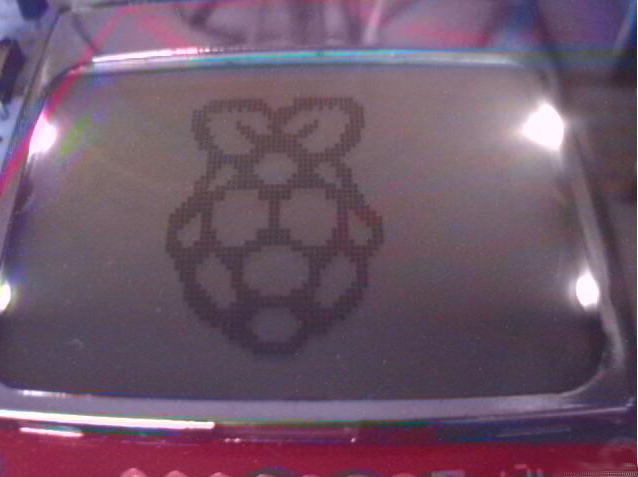
You can now test the installation with the proposed examples:
cd examples
./pi_logo.py
If installation works properly, you should see the following screen:
You can try to execute other examples to see what the library is capable to do with this LCD.
Usage
As I said in introduction, RPi-Monitor is gathering a lot of information and some of them may be interesting to have without having to start a PC. Information are made available from the embedded web server. To get and display the information we then just have to create a web client and use the library to display.
For people interesting about learning development I did comment my code:
#!/usr/bin/env python
import httplib, time, os, sys, json
import pcd8544.lcd as lcd

# class Process dedicated to process data get from Client
# and send information to LCD and console
class Process:
  # Process constructor
  def __init__(self):
    # Initialize LCD
    lcd.init()
    # Turn the backlight on
    lcd.backlight(1)

  def run(self, jsonString):
    # Parse data as json
    data = json.loads( jsonString )
    # Try to get data from json or return default value
    try:
      rpi_temperature = data['living_room_temp']
    except:
      rpi_temperature="--.---"

    try:
      rpi_humidity = data['humidity']
    except:
      rpi_humidity = "--"

    # Construct string to be displayed on screens
    temperature = "Temp: %s C" % rpi_temperature
    humidity = "Humidity: %s %%" % rpi_humidity
    lcd.gotorc(0,1)
    lcd.text("RPi-Monitor")
    lcd.gotorc(2,0)
    lcd.text(temperature)
    lcd.gotorc(3,0)
    lcd.text(humidity)

    # Also print string in console
    os.system("clear")
    print " RPi-Monitor "
    print
    print temperature
    print humidity
    print
    time.sleep(1)

# Class client design to work as web client and get information
# from RPi-Monitor embedded web server
class Client:
  # Client constructor
  def __init__(self):
    # Create a Process object
    self.process = Process()

  def run(self):
    # Infinite loop
    while True:
    try:
      # Initiate a connection to RPi-Monitor embedded server
      connection = httplib.HTTPConnection("localhost", 8888)
      # Get the file dynamic.json
      connection.request("GET","/dynamic.json")
      # Get the server response
      response = connection.getresponse()
      if ( response.status == 200 ):
        # If response is OK, read data
        data = response.read()
        # Run process object on extracted data
        self.process.run(data)
      # Close the connection to RPi-Monitor embedded server
      connection.close()
    finally:
      # Wait 5 secondes before restarting the loop
      time.sleep(5)

# Main function
def main():
  try:
    # Create a Client object
    client = Client()
    # Run it
    client.run()
  except KeyboardInterrupt:
    # if Ctrl+C has been pressed
    # turn off the lcd backlight
    lcd.backlight(0);
    # exit from the program
    sys.exit(0)

# Execute main if the script is directly called
if __name__ == "__main__":
    main()
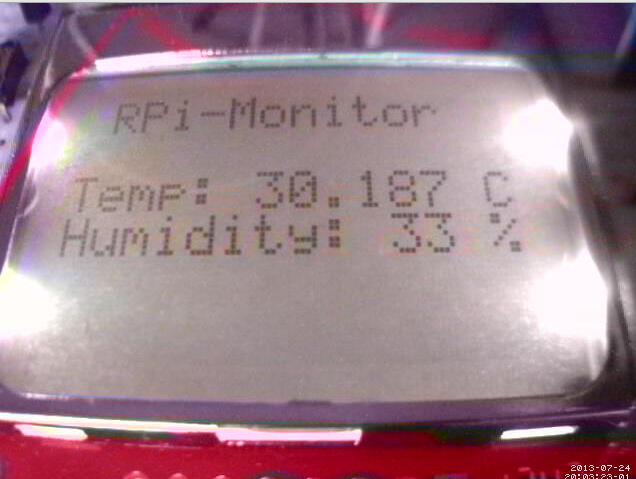
This code is dedicated to extract the living room temperature and humidity from RPi-Monitor information.
Copy this code into a file rpimonitor-testlcd.py the make this file
executable chmod +x rpimonitor-testlcd.py then execute ./rpimonitor-testlcd.py it to see: